Install
How to install OpenCore Legacy Patcher
The complete OCLP tutorial, in the order that avoids the common mistakes: prepare the Mac, make the installer, build OpenCore, boot, install macOS, make it boot on its own, and restore the drivers. Screenshots are from OCLP 3.0.0 running on our test Macs.
On this page 5 sections
In short
Back up, update the Mac to the newest macOS Apple gives it, then in OpenCore Legacy Patcher: Create macOS Installer on a 32 GB USB drive, Build and Install OpenCore to that drive, restart holding Option and pick EFI Boot, install macOS, install OpenCore again to the internal disk, and run Post-Install Root Patch. Plan 1.5 to 3 hours, most of it downloading and installing.
Before you start
- A supported Mac
- Check it in the Mac Checker. Note its model identifier (for example
MacBookPro11,1). - A USB drive
- 32 GB or larger. It will be erased. Dortania recommends 32 GB because recent macOS installers plus OCLP's files do not fit on 16 GB.
- A backup
- Time Machine or a full clone of your disk. Installing macOS can go wrong on any Mac; on a patched one, more so.
- Internet, ideally Ethernet
- The app downloads macOS (12 to 18 GB) and, during root patching, extra packages. Wi-Fi may not work until root patches are installed.
- Time
- About 30 to 60 minutes to download and write the installer, 45 to 90 minutes to install macOS, 10 minutes to patch.
- For 2008–2010 Macs
- A USB keyboard and mouse. On Macs with USB 1.1 internals, the built-in keyboard and trackpad may not work in the installer until the USB 1.1 patch is applied.
Update the firmware first
Install the newest macOS that Apple offers for your Mac (and its updates) before you start. Firmware updates come with macOS installers, and Dortania strongly recommends being on the newest firmware before using OCLP. After you switch to a patched macOS, you cannot get those firmware updates any more.Step by step
Download and open OpenCore Legacy Patcher
5 minutes
Download
OpenCore-Patcher.pkgfrom the official GitHub release (2.5.1 for up to Sequoia, 3.0.0 for Tahoe) and install it. You can do this on the old Mac itself or on any other Mac. Open OpenCore-Patcher from Applications.Version 3.0.0 first shows a welcome screen with the project's contributors; scroll to the end to continue. The main menu then shows the detected model under the title.
Real screenshot · OCLP 3.0.0-rc.5 · macOS 15.7.9 (24G830) · GitHub macos-15-intelThe welcome and credits screen OCLP 3.0.0 shows on first launch (and under Credits). 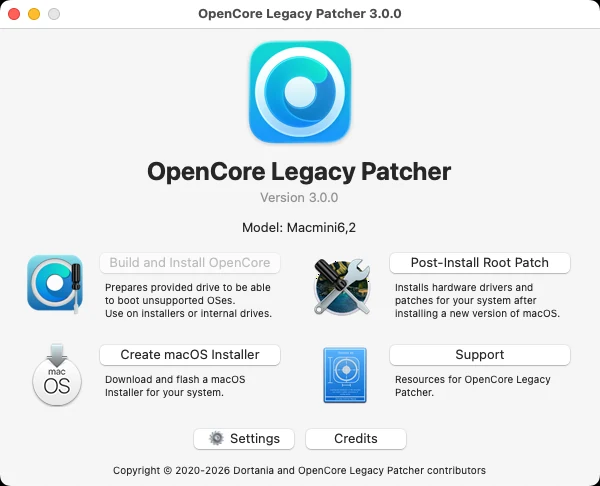
Real screenshot · OCLP 3.0.0-rc.5 · macOS 15.7.9 (24G830) · GitHub macos-15-intelThe OCLP 3.0.0 main menu. “Model” shows the Mac it detected; Build and Install OpenCore is greyed out here because our test machine is a virtual Mac. If you are preparing the USB drive on a different Mac than the one you will install on, open Settings first and choose the target model. OpenCore configurations are built for one model, and automatic root patching after the install depends on this choice.
Create the macOS installer
30–60 minutes
Click Create macOS Installer, then Download macOS Installer. The app lists the newest release of the four latest macOS versions, straight from Apple's catalog; tick Show Older/Beta Versions for others.
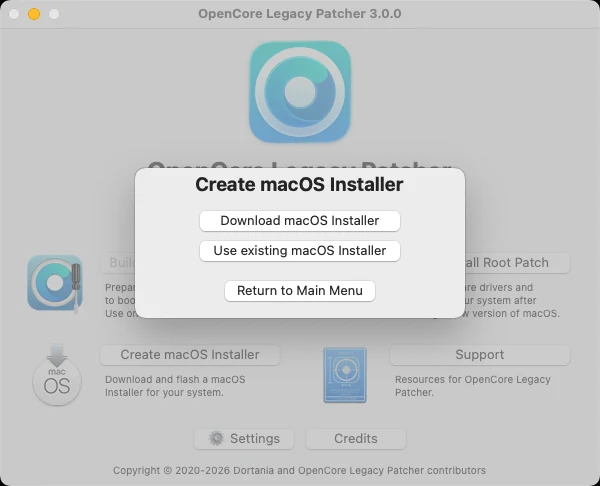
Real screenshot · OCLP 3.0.0-rc.5 · macOS 15.7.9 (24G830) · GitHub macos-15-intelCreate macOS Installer: download an installer from Apple, or use one you already have. Pick the version you want (our pick for your Mac), wait for the download, then choose your USB drive. The drive is erased, macOS is written to it, and OCLP adds its own files so it can root-patch automatically after the install.
Already have the installer app in Applications? Choose Use existing macOS Installer instead.
Build and install OpenCore to the USB drive
2 minutes
Back in the main menu, click Build and Install OpenCore. The build starts right away, with a log in the window. The app assembles an OpenCore EFI folder for your model: the bootloader, the drivers (kexts) it needs, and a
config.plist.What the build logs (MacBookPro9,2, our run)- Adding OpenCore v1.0.6 RELEASE - Adding Lilu.kext 1.7.2 - Enabling BCM943224 and BCM94331 Networking Support - Adding AirportBrcmFixup.kext 2.2.1 - Enabling macOS 26 FileVault 2 support - Disabling AMFI - Adding AMFIPass.kext 1.4.1 - Adding RestrictEvents.kext 1.1.7 Your OpenCore EFI for MacBookPro9,2 has been built at: …When the build finishes, click 🔩 Install OpenCore, choose the USB drive under Select disk to install OpenCore onto, then its EFI partition. Enter your password if asked. (Disk missing? It must be formatted GUID/GPT or have a FAT32 partition, as the app notes.)
Boot the installer through OpenCore
5 minutes
Plug the USB drive into the old Mac and restart it while holding Option. Apple's startup manager appears. Choose EFI Boot (the entry with the OpenCore icon). The OpenCore boot picker appears next: choose Install macOS ….
Boots your installed macOS through OpenCore. This is what you choose every day.
Interactive replica, drawn by us (not OpenCore's artwork). Click it, then use the keys. Your entry names depend on your disks and macOS version. Mac Pros, Xserves and iMacs with upgraded graphics cards may show no Apple startup manager. Dortania's boot guide explains how to set the default boot device from Recovery with
blessinstead.Install macOS
45–90 minutes
The installer works as on any Mac. In Disk Utility you can erase the internal disk for a clean install, or install over your current macOS to keep your data (only if it was not patched with another patcher such as Patched Sur).
- Brand-new disk: choose View > Show All Devices in Disk Utility and erase the whole disk (the top item), so the EFI partition OCLP needs is created.
- 2016–2017 MacBook Pro with Touch Bar (T1): erase only the macOS volume, never the whole disk, when installing Sonoma or newer, or Touch ID and the Touch Bar stop working (Dortania).
- The Mac restarts several times. If it returns to the start of setup, restart holding Option, choose EFI Boot, then the grey disk named macOS Installer or your disk's name. Repeat until setup finishes.
Make the Mac boot without the USB drive
5 minutes
Once you reach the desktop, open OpenCore Legacy Patcher (it was installed automatically if you created the USB with the app), choose Build and Install OpenCore, wait for the build, click Install OpenCore and pick the internal disk. Restart holding Option, pick the internal EFI Boot, and press Ctrl+Enter on your macOS disk to make it the default. From now on the Mac starts by itself; you can remove the USB drive.
Apply the root patches
5–15 minutes
If you made the USB drive with OCLP for this model, root patches install automatically on first boot. Otherwise, or if something is missing (no graphics acceleration, no Wi-Fi, no sound), open the app and choose Post-Install Root Patch. It lists the patches for your hardware; click Start Root Patching and restart.
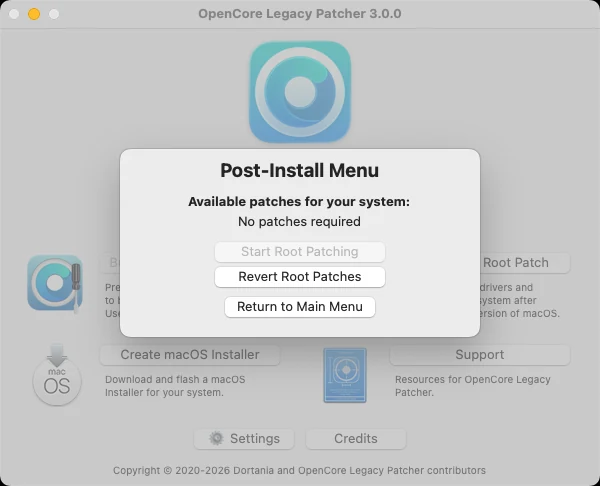
Real screenshot · OCLP 3.0.0-rc.5 · macOS 15.7.9 (24G830) · GitHub macos-15-intelPost-Install Root Patch: the menu lists the patches for your hardware. On our virtual test Mac it reports “No patches required”. Some Macs need extra downloads during patching: Apple's Kernel Debug Kit (AMD GCN and Polaris GPUs from Ventura, every Mac on Tahoe for audio) or Dortania's MetallibSupportPkg (Ivy Bridge, Haswell and Kepler on Sequoia). Without internet, OCLP first installs only the Wi-Fi patch so you can connect, then asks you to run root patching again.
After the first boot: a checklist
- Graphics: the Dock and menu bar are translucent and windows move smoothly. If everything is slow and flat grey, root patches are missing.
- Wi-Fi and Bluetooth work.
- Sound works, including the built-in speakers.
- The Mac starts without the USB drive.
- Spotlight indexing makes a new install slow for a few hours. Let it finish before judging performance (Dortania FAQ).
- Turn off automatic installation of macOS updates in Software Update, so you choose when to update and can re-patch right away. See Updating.
Settings worth knowing
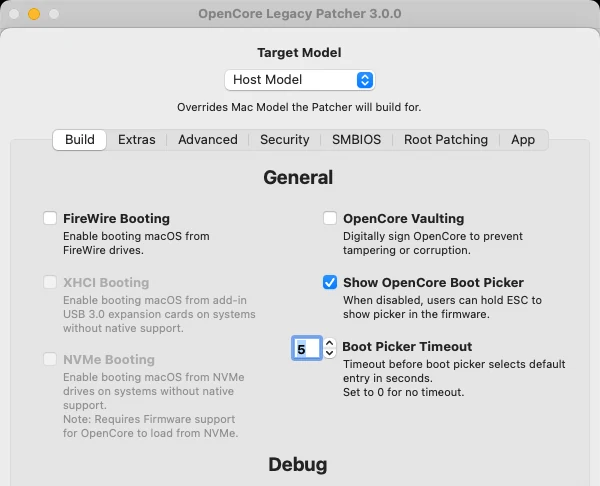
| Setting | Default | When to change it |
|---|---|---|
| Target model | The Mac you run the app on | When you build for another Mac. |
| Show OpenCore Boot Picker | On, 5-second timeout | Turn off for a seamless start; hold Esc while choosing EFI Boot to see the picker again. |
| Verbose boot | Off | Turn on to see boot messages when troubleshooting. |
| System Integrity Protection | Set by OCLP for your Mac and macOS | Leave it. OCLP lowers SIP only where root patching needs it. |
Common questions
Can I install OpenCore Legacy Patcher without a USB drive?
Will I lose my data?
Do I need to reinstall OpenCore after every macOS update?
My Mac shows a prohibited sign or the installer will not boot.
Keep going
Something wrong or out of date on this page? Email hello@oclp.dev and we will fix it (see our corrections policy).